O-RAN Near-RT RIC
Overview
This tutorial details the experimental setup and procedures for deploying and testing an O-RAN Near-Real-Time RAN Intelligent Controller (Near-RT RIC) with xApps. It covers the complete process from environment setup to xApp deployment and testing.
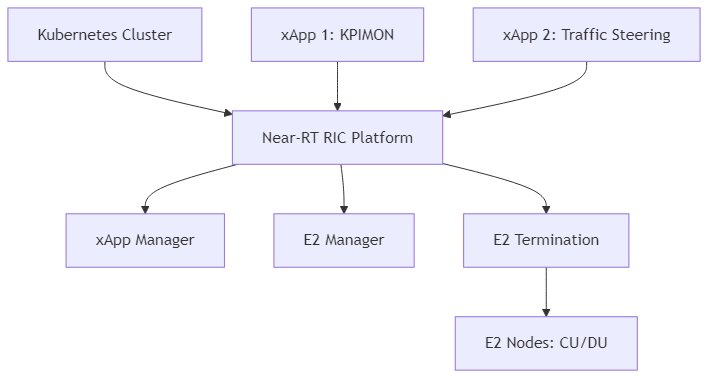
Note
The diagram above shows the experimental setup for the Near-RT RIC, including the Kubernetes cluster, Near-RT RIC platform components (xApp Manager, E2 Manager, E2 Termination), xApps (KPIMON, Traffic Steering), and E2 Nodes (CU/DU).
Note: Before deploying the experiment, ensure you have proper access to the testbed (e.g., SSH access to the gateway node and virtual machines).
Objective
Deploy Near-RT RIC: Set up a Near-RT RIC platform in a Kubernetes environment.
Develop and Deploy xApps: Create and deploy example xApps on the Near-RT RIC platform.
Connect to E2 Nodes: Establish connections between the Near-RT RIC and E2 Nodes (CU/DU).
Test and Validate: Verify the functionality of the Near-RT RIC and xApps.
Understand O-RAN Architecture: Gain practical knowledge of O-RAN components and their interactions.
Resources
- Hardware:
Server with sufficient resources (minimum 8 CPU cores, 16GB RAM, 100GB storage)
Network connectivity to E2 Nodes (CU/DU)
- Software:
Ubuntu 20.04 LTS
Kubernetes (K8s) or Minikube
Docker
Helm
O-RAN Software Community (OSC) Near-RT RIC components
Example xApps (e.g., KPIMON)
Prerequisites
Before starting the experiment, ensure the following prerequisites are met:
Kubernetes Cluster: - A running Kubernetes cluster (or Minikube for local testing) - kubectl configured to access the cluster
Docker: - Docker installed and configured - Access to Docker Hub or a private Docker registry
Helm: - Helm 3 installed
Network Configuration: - Network connectivity between the Kubernetes cluster and E2 Nodes - Required ports open in firewalls
Experimental Procedure
Setting Up the Environment
Install Required Tools:
# Update package list
sudo apt update

# Install Docker
sudo apt install -y docker.io
sudo systemctl enable docker
sudo systemctl start docker
sudo usermod -aG docker $USER

# Install kubectl
curl -LO "https://dl.k8s.io/release/$(curl -L -s https://dl.k8s.io/release/stable.txt)/bin/linux/amd64/kubectl"
chmod +x kubectl
sudo mv kubectl /usr/local/bin/

# Install Minikube (for local testing)
curl -LO https://storage.googleapis.com/minikube/releases/latest/minikube-linux-amd64
chmod +x minikube-linux-amd64
sudo mv minikube-linux-amd64 /usr/local/bin/minikube

# Install Helm
curl https://raw.githubusercontent.com/helm/helm/main/scripts/get-helm-3 | bash
Start Minikube (for local testing):
minikube start --cpus=4 --memory=8192 --disk-size=50g
Clone the O-RAN SC Near-RT RIC Repository:
git clone https://gerrit.o-ran-sc.org/r/ric-plt/ric-dep
cd ric-dep/bin
Deploying the Near-RT RIC Platform
Deploy the Near-RT RIC Platform using Helm:
# Deploy the Near-RT RIC platform
./deploy-ric-platform -f ../helm/ric-common/config/config-values.yaml
Verify the Deployment:
kubectl get pods -n ricplt
Expected output:
NAME                                        READY   STATUS    RESTARTS   AGE
deployment-ricplt-a1mediator-5b8b7f9c7b-7vxrw   1/1     Running   0          2m
deployment-ricplt-appmgr-6c774c5bc4-m5lzs       1/1     Running   0          2m
deployment-ricplt-dbaas-7c44fb4697-xh7xs        1/1     Running   0          2m
deployment-ricplt-e2mgr-7976f5f5d4-nhkl7        1/1     Running   0          2m
deployment-ricplt-e2term-alpha-7c4b5446bf-8g5xz 1/1     Running   0          2m
deployment-ricplt-rtmgr-665f74d94-kfzxp         1/1     Running   0          2m
deployment-ricplt-submgr-6bbfc8cf8f-t4h2t       1/1     Running   0          2m
deployment-ricplt-vespamgr-864f96c6cb-nl9w8     1/1     Running   0          2m
Developing and Deploying xApps
Clone the xApp SDK Repository:
git clone https://gerrit.o-ran-sc.org/r/ric-app/ric-app-kpimon
cd ric-app-kpimon
Build the xApp Docker Image:
docker build -t kpimon-xapp:latest .
Push the Docker Image to a Registry:
# For Docker Hub
docker tag kpimon-xapp:latest <your-dockerhub-username>/kpimon-xapp:latest
docker push <your-dockerhub-username>/kpimon-xapp:latest

# For a private registry
docker tag kpimon-xapp:latest <private-registry-url>/kpimon-xapp:latest
docker push <private-registry-url>/kpimon-xapp:latest
Create a Config File for the xApp:
cat > config.json << EOF
{
  "name": "kpimon",
  "version": "1.0.0",
  "containers": [
    {
      "name": "kpimon",
      "image": {
        "registry": "<your-registry>",
        "name": "kpimon-xapp",
        "tag": "latest"
      }
    }
  ],
  "messaging": {
    "ports": [
      {
        "name": "rmr-data",
        "container": "kpimon",
        "port": 4560,
        "rxMessages": ["RIC_SUB_RESP", "RIC_INDICATION"],
        "txMessages": ["RIC_SUB_REQ"],
        "policies": [],
        "description": "RMR port for data"
      },
      {
        "name": "rmr-route",
        "container": "kpimon",
        "port": 4561,
        "description": "RMR port for route"
      }
    ]
  },
  "rmr": {
    "protPort": "tcp:4560",
    "maxSize": 2072,
    "numWorkers": 1,
    "txMessages": ["RIC_SUB_REQ"],
    "rxMessages": ["RIC_SUB_RESP", "RIC_INDICATION"]
  }
}
EOF
Deploy the xApp using the App Manager API:
# Get the App Manager service IP and port
APPMGR_IP=$(kubectl get svc -n ricplt service-ricplt-appmgr-http -o jsonpath='{.spec.clusterIP}')
APPMGR_PORT=$(kubectl get svc -n ricplt service-ricplt-appmgr-http -o jsonpath='{.spec.ports[0].port}')

# Deploy the xApp
curl -X POST "http://$APPMGR_IP:$APPMGR_PORT/ric/v1/xapps" -H "Content-Type: application/json" -d @config.json
Verify the xApp Deployment:
kubectl get pods -n ricxapp
Expected output:
NAME                      READY   STATUS    RESTARTS   AGE
ricxapp-kpimon-7f7b9b6f8c-2xvqz   1/1     Running   0          1m
Connecting to E2 Nodes
Configure E2 Node Connectivity:
The E2 Nodes (CU/DU) need to be configured to connect to the Near-RT RIC. This typically involves:
Setting the E2 Termination (E2T) IP address and port in the E2 Node configuration
Configuring the SCTP connection parameters
Setting up the E2AP protocol parameters
Verify E2 Node Connection:
# Check E2 Manager logs
kubectl logs -n ricplt deployment-ricplt-e2mgr-7976f5f5d4-nhkl7
Look for messages indicating successful connection from E2 Nodes.
Testing and Validation
Verify xApp Subscription to E2 Nodes:
# Check xApp logs
kubectl logs -n ricxapp ricxapp-kpimon-7f7b9b6f8c-2xvqz
Look for messages indicating successful subscription to E2 Nodes.
Monitor xApp Operation:
# Continue monitoring xApp logs
kubectl logs -n ricxapp ricxapp-kpimon-7f7b9b6f8c-2xvqz -f
Look for messages indicating reception of E2 indications and processing of data.
Access xApp API (if available):
# Get the xApp service IP and port
XAPP_IP=$(kubectl get svc -n ricxapp service-ricxapp-kpimon-http -o jsonpath='{.spec.clusterIP}')
XAPP_PORT=$(kubectl get svc -n ricxapp service-ricxapp-kpimon-http -o jsonpath='{.spec.ports[0].port}')

# Access the xApp API
curl -X GET "http://$XAPP_IP:$XAPP_PORT/ric/v1/kpimon/metrics"
Advanced Experiments
Developing a Custom xApp:
You can develop your own xApp to implement custom control logic. The basic steps are:
Create a new xApp project using the xApp SDK
Implement the required functionality
Build and deploy the xApp as described above
Testing Multiple xApps:
You can deploy multiple xApps and test their interaction. For example:
Deploy a KPIMON xApp to collect metrics
Deploy a Traffic Steering xApp to optimize traffic based on the metrics
Observe how the xApps interact and affect the RAN performance
Integration with Non-RT RIC:
You can integrate the Near-RT RIC with a Non-RT RIC to test policy-based control:
Deploy a Non-RT RIC (e.g., using the OSC implementation)
Configure the A1 interface between the Non-RT RIC and Near-RT RIC
Define and deploy policies from the Non-RT RIC to the Near-RT RIC
Observe how the policies affect the behavior of xApps
Troubleshooting
xApp Deployment Issues:
Check the App Manager logs: kubectl logs -n ricplt deployment-ricplt-appmgr-6c774c5bc4-m5lzs
Verify the xApp config file format
Check if the Docker image is accessible
E2 Connection Issues:
Check the E2 Manager logs: kubectl logs -n ricplt deployment-ricplt-e2mgr-7976f5f5d4-nhkl7
Verify network connectivity between the Near-RT RIC and E2 Nodes
Check firewall settings
xApp Runtime Issues:
Check the xApp logs: kubectl logs -n ricxapp ricxapp-kpimon-7f7b9b6f8c-2xvqz
Verify that the xApp is subscribed to the correct E2 service model
Check if the E2 Nodes are sending the expected indications
Conclusion
- This experiment demonstrates how to:
Deploy a Near-RT RIC platform in a Kubernetes environment
Develop and deploy xApps on the Near-RT RIC platform
Connect the Near-RT RIC to E2 Nodes
Test and validate the functionality of the Near-RT RIC and xApps
The Near-RT RIC is a key component of the O-RAN architecture, enabling programmability and intelligence in the RAN. By deploying and experimenting with the Near-RT RIC and xApps, you can gain practical knowledge of O-RAN components and their interactions, and explore the potential of open, intelligent, and programmable RAN.
References
O-RAN Software Community (OSC): https://o-ran-sc.org/
O-RAN SC Near-RT RIC: https://docs.o-ran-sc.org/projects/o-ran-sc-ric-plt-ric-dep/en/latest/
O-RAN SC xApp SDK: https://docs.o-ran-sc.org/projects/o-ran-sc-ric-plt-xapp-frame/en/latest/
O-RAN Alliance Specifications: https://www.o-ran.org/specifications